
2D Gel Image Alignment Explained: Why, How and What Can Go Wrong

No two 2D gels are the same shape. The same protein sits a few pixels to the left on one gel, a little lower on the next, and stretched toward the corner on a third, because strips, gels, runs and scanners all introduce small positional differences that have nothing to do with the biology. Image alignment is the step that removes those differences, so that a spot on gel 1 and the same spot on gel 12 occupy the same coordinates and can be compared. How and when it is done decides the quality of everything that follows. This article explains where positional variation comes from, what alignment actually does to an image, why aligning images before detecting spots gives more reliable results than detecting first and matching afterward, how to judge whether an alignment is good, and what to do when it is not.
What is image alignment in 2D gel analysis?
Image alignment (also called warping, registration or image normalization) is the geometric transformation of one gel image so that its protein spots superimpose on the corresponding spots of another. The image chosen as the target is the reference; every other image in the experiment is warped onto it. After alignment, a given protein has the same x and y coordinates on every image, so its abundance can be read from the same place on each gel and compared directly.
Alignment does not change spot intensities. It moves pixels; it does not brighten or darken them. A well-designed alignment preserves the volume of every spot so that quantification after alignment is the same as it would have been before, only now in a shared coordinate system. Dowsey, Dunn and Yang’s RAIN method, for example, is built on a volume-invariant B-spline model for precisely this reason.
Alignment is needed because the alternative, comparing spots by their raw coordinates, fails at once. Görg, Weiss and Dunn note that even with immobilized pH gradient strips, which fixed the reproducibility problems of the original carrier-ampholyte method, gel-to-gel variation remains and replicate gels are essential; the analysis has to bring those replicates into register before it can compare them.
Where positional variation comes from
Positional differences between gels have several causes, and they produce different patterns of distortion. Knowing the pattern helps you recognize what an alignment algorithm has to correct.
| Cause | Where in the workflow | Pattern of distortion |
|---|---|---|
| Strip placement on the second-dimension gel | Loading the IPG strip | Whole pattern shifted or slightly rotated; a global offset |
| Strip length and rehydration | First dimension | Horizontal stretch or compression across the whole gel |
| pH gradient drift, sample salt, focusing time | Isoelectric focusing | Horizontal shifts that vary along the pI axis; worst at the ends |
| Gel casting and acrylamide concentration | Second dimension | Vertical stretch; band spacing differs between gels |
| Uneven heating or current during the run | Second dimension | "Smiling" or "frowning" fronts; distortion increasing toward the edges |
| Gel swelling, shrinking or tearing in staining | Staining and destaining | Non-uniform local distortion, sometimes large |
| Scanner placement and resolution | Imaging | Rotation, offset, scale change |
| Different gel sizes or formats within one study | Any | Large global scale differences; align within format first |
Two things follow from the table. First, some of the variation is global (an offset, a rotation, a uniform stretch) and can be described by a handful of parameters, while the rest is local and varies smoothly across the gel. An alignment method has to handle both, which is why simple rigid transforms are not enough and why modern methods use a flexible, multi-scale model. Second, several of these causes can be reduced at the bench: consistent strip placement, one gel batch per experiment, temperature control in the second dimension, and careful handling in staining all make alignment easier. Our guide to 2D electrophoresis covers the running conditions.
What alignment does to an image
Every alignment algorithm has to do two things: find correspondences between the two images, and compute a transformation from them.
Correspondences are pairs of points that are known to be the same feature on both images. They may be spot centers, landmarks placed by the user, or, in image-based methods, the local image content itself, matched by maximizing the similarity between the two images at each scale.
The transformation is the mathematical rule that moves every pixel of the image being aligned to its new position. A rigid transform allows only translation and rotation. An affine transform adds uniform scaling and shear. Neither is enough for gels, whose distortion varies from place to place, so gel alignment uses non-rigid transforms: piecewise models that divide the gel into regions and warp each one, or smooth spline-based models such as the third-order B-spline used in RAIN, which bends the whole image like a rubber sheet with the amount of bending constrained so that spots keep their shape and volume.
The practical consequence for a user is that a good alignment is a smooth vector field. If you draw an arrow from each point’s original position to its aligned position, the arrows should change gradually across the gel, with neighboring arrows pointing in similar directions. Arrows that flip direction between neighbors, or one arrow much longer than those around it, indicate a mismatched correspondence, and that is the thing to look for when reviewing.
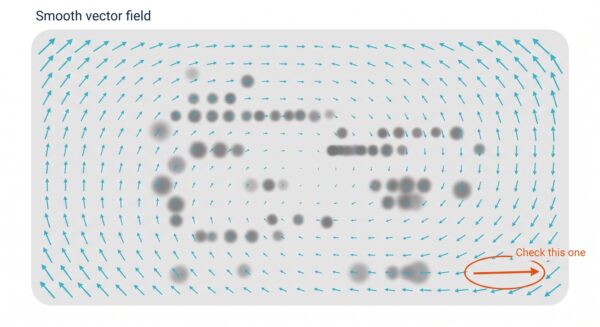
A good alignment is a smooth vector field. Neighboring arrows point in similar directions; one long arrow pointing the other way is a correspondence to check.
Align first or match afterward? Two approaches compared
There are two ways to arrive at a set of matched spots across an experiment, and they give different results.
The older approach, which most packages still use, detects spots on each gel separately, so that every gel has its own spot list, and then matches the lists: spot 213 on gel 1 is declared the same protein as spot 198 on gel 2, and so on. Alignment, where it is done at all, serves the matching step. The problem is that the decision about what is a spot is made independently on every gel before any comparison has taken place. A faint spot detected on nine gels and missed on the tenth becomes a missing value; two spots resolved on one gel and merged on another cannot be matched one to one; and every mismatch has to be found and edited by hand, gel by gel. Dowsey and colleagues describe this in their 2010 review as the central weakness of deterministic, spot-centric approaches, which “discard information early in the pipeline, propagating errors” through everything downstream.
The newer approach reverses the order. The images are aligned first, at the pixel level, using the whole image rather than a list of detected spots, and only then is spot detection run, once, across the whole set of aligned images. Because every gel is in the same coordinate system, one spot pattern can be applied to all of them: every spot outline exists on every gel, every spot has a volume on every gel, and there is nothing to match. Dowsey, Dunn and Yang’s 2008 paper demonstrated this framework with RAIN, showed substantial improvements in matching accuracy and differential sensitivity against an established spot-matching method on both real and synthetically warped gels, and gave the reason: symbolic representation at the very early stages introduces persistent errors from inaccuracies in modeling and alignment, and working in the image domain avoids them.
| Property | Detect each gel, then match spots | Align images, then detect one pattern |
|---|---|---|
| Order of operations | Spot detection on every gel, then alignment or matching of spot lists | Pixel-level alignment of every image to a reference, then one detection across all |
| Information used for alignment | Spot centers and landmarks | The whole image at multiple scales |
| Missing values | Common: a spot missed on one gel has no value there | None: every spot outline exists on every gel |
| Spot editing | Per gel; an edit on one gel must be repeated or matched on the others | Once; an edit propagates to every gel |
| Errors from early decisions | Persist and propagate downstream | Avoided, because no symbolic decision is made before alignment |
| Effort | Grows with gel count; matching review dominates | Roughly constant per gel; review is of alignment, not matches |
| Statistics | Run on incomplete data, or after imputation | Run on a complete dataset |
SameSpots is built on the second approach. It aligns every image to the reference with a pixel-level algorithm, then detects a single spot pattern across the whole experiment, which is what allows it to guarantee that every spot is matched on every gel. An independent peer-reviewed comparison against DeCyder found that alignment before coherent spot detection replaced the time-consuming spot matching step and markedly reduced the time needed for quantitative analysis.
Choosing the reference image
Every image in the experiment is warped onto the reference, so its choice matters. The reference should be a real gel from the experiment, not a composite, and it should be the one that is most representative: a clean, well-focused gel with a typical spot pattern, few artifacts, good spot separation and no large distortions. A gel from the middle of the pattern, rather than an extreme, means the average warp to the other gels is smaller. In a DIGE experiment the Cy2 internal standard image on a good gel is the natural reference, because it contains every spot present in any sample.
Avoid choosing the reference by group. If the reference is a control gel, treated gels have on average a longer warp than control gels, and any error that grows with warp distance is then confounded with the treatment. Pick the reference on image quality alone, and, where the software allows it, check the alignment of the reference’s own group with the same care as the others.
Automatic alignment and manual vectors
Modern alignment is automatic. The software finds correspondences across the image and computes the warp without user input, and for well-run gels from one experiment the automatic result is usually final. Two things remain for the user.
The first is review. Every alignment should be checked before spot detection, because an error at this stage flows into every spot volume on that gel. The tools for checking are described in the next section.
The second is manual vectors for difficult regions. A vector is a correspondence placed by the user: a point on the gel being aligned and the point on the reference it should move to. Vectors are the remedy when a region of a gel is so distorted, faint or artifact-ridden that the automatic search has locked onto the wrong feature. A few well-placed vectors in the problem region, followed by re-running the automatic alignment with those vectors as constraints, usually resolves it; you are giving the algorithm a hint, not aligning the gel by hand.
In SameSpots, alignment is automatic, manual vector placement is available for difficult regions, and the alignment can be reviewed and adjusted at any time.
How to judge alignment quality
A good alignment has three properties: corresponding spots coincide, the warp is smooth, and nothing has been aligned to the wrong feature. There are four ways to check them, and a thorough review uses all four.
Overlay and flicker
Display the aligned gel and the reference in contrasting false colors (for example magenta and green) so that superimposed spots appear white or gray and misaligned spots appear as colored pairs. Flickering between the two images does the same job dynamically: aligned spots stay still, misaligned spots appear to jump. Scan the whole gel, paying particular attention to the corners and edges, where distortion is largest, and to crowded regions, where a one-spot offset is easy to miss.
Checkerboard
Divide the view into a checkerboard with the aligned gel in the light squares and the reference in the dark ones. Spot patterns should run continuously across square boundaries; a discontinuity at a boundary shows a local misalignment.
Vector field inspection
View the alignment vectors. They should form a smooth field. Look for isolated long vectors, vectors that cross, and abrupt changes of direction between neighbors; each marks a correspondence to check and, if wrong, delete.
Spot-level residuals
After spot detection, look at the aligned images through the spot outlines. A spot outline that fits its spot on the reference but sits to one side of the corresponding spot on an aligned gel shows a residual misalignment of that size. Where the software reports a residual distance per spot, sort by it and inspect the largest.
A useful habit is to review in two passes: a fast pass over every gel looking only for gross problems (a whole region shifted, a gel that clearly failed), then a careful pass on the gels that pass the first, concentrating on the edges and the regions that matter for the biology.
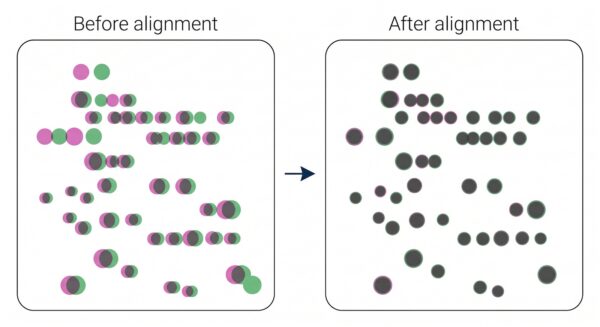
Overlay the gel and the reference in contrasting colors. Misaligned spots show as colored pairs; aligned spots turn gray.
Troubleshooting alignment problems
| Symptom | Likely cause | What to do |
|---|---|---|
| Whole gel offset or rotated after automatic alignment | Very large global difference, or the gel was scanned in a different orientation | Rotate, flip or crop the image to match the reference before aligning; re-run |
| Edges and corners misaligned, center fine | Distortion increasing toward the edges (smiling front, swelling in staining) | Add two or three manual vectors near the edges and re-run automatic alignment |
| One region misaligned, rest fine | A local artifact (bubble, tear, streak) has attracted the correspondence search | Place vectors on real spots either side of the artifact; exclude the artifact from analysis |
| Crowded region aligned one spot out | Repeating spot trains (charge isoforms) matched to the wrong neighbor | Place a vector on an unambiguous spot in the train and re-run |
| Faint gel aligns poorly | Too little image content for the search | Increase display contrast (not the data), or align to a nearby gel first and then to the reference |
| Vectors cross or point in opposite directions | Contradictory correspondences | Delete the vectors in that region and re-place fewer, more confident ones |
| Alignment looks good but statistics show a gel as an outlier | Alignment error small but systematic, or a genuine sample problem | Check the vector field and residuals for that gel; if alignment is sound, treat it as a biological or technical outlier |
| Different gel format in the same study | Scale difference too large for one warp | Align each format to its own reference, then align the references to each other |
Prevention is cheaper than correction. Consistent bench technique reduces the warp that alignment has to remove, and a good reference gel reduces the average warp for all the others.
Alignment in 2D-DIGE experiments
DIGE gels carry up to three images that come from the same gel, scanned at different wavelengths. Those images are already in register with each other, apart from any small offset between scanner channels, so alignment within a gel is trivial. Alignment between gels is the same problem as for conventional 2D gels and is done on one channel per gel, almost always the Cy2 internal standard, which is then applied to the Cy3 and Cy5 images of the same gel. Because the standard contains every protein in the experiment, it gives the alignment the most content to work with and avoids aligning on a channel whose spot pattern depends on the treatment. Our comparison of 2D-DIGE and 2D gel electrophoresis explains the internal standard in more detail.
Frequently asked questions
What is image alignment in 2D gel electrophoresis?
The geometric warping of each gel image so that its protein spots superimpose on the corresponding spots of a reference image. It removes the positional differences between gels so that the same protein can be measured at the same coordinates on every gel.
Why do 2D gels need to be aligned?
Because no two gels run identically. Strip placement, focusing, gel casting, run conditions, staining and scanning all move spots by different amounts in different places. Without alignment, spots cannot be compared across gels.
What is the difference between image alignment and spot matching?
Spot matching pairs up spots that were detected separately on each gel. Image alignment warps the whole image so that corresponding features coincide before any spots are detected. Aligning first and then detecting one spot pattern avoids the missing values and matching errors of the detect-then-match approach.
Does alignment change spot volumes?
A properly designed alignment does not. It moves pixels into a shared coordinate system while preserving each spot’s volume, so quantification after alignment reflects the original gel.
What is a reference gel?
The image that all the other images in the experiment are aligned to. Choose a clean, representative gel from the middle of the pattern, chosen for image quality rather than for its treatment group; in DIGE, the Cy2 standard image of a good gel.
What are alignment vectors?
Correspondences between a point on the gel being aligned and the point on the reference it should move to. The software generates them automatically; users add manual vectors in regions where the automatic search has failed.
How do I know if my gel alignment is good?
Overlay the gel and the reference in contrasting colors and check that spots coincide, especially at the edges; use a checkerboard view to look for discontinuities; inspect the vector field for isolated or crossing vectors; and, after detection, check that spot outlines fit on every gel.
Can alignment fix a badly run gel?
Within limits. Alignment corrects smooth distortion well and local distortion with help from manual vectors. It cannot recover spots that did not resolve, and a gel with severe streaking, tearing or missing regions is usually better excluded.
Which software aligns 2D gel images automatically?
SameSpots from TotalLab aligns every image to a reference with a pixel-level algorithm, with manual vectors available for difficult regions, and then detects one spot pattern across the whole experiment so that every spot is matched on every gel.
References
1. Dowsey AW, Dunn MJ, Yang GZ. Automated image alignment for 2D gel electrophoresis in a high-throughput proteomics pipeline. Bioinformatics. 2008;24(7):950-7. https://doi.org/10.1093/bioinformatics/btn059
(Source for: symbolic representation early in analysis introducing persistent errors; the RAIN framework with a volume-invariant third-order B-spline in a multi-resolution scheme; direct comparison in the image domain; substantial improvements in matching accuracy and differential sensitivity against an existing method on real and synthetically warped gels.)
2. Dowsey AW, English JA, Lisacek F, Morris JS, Yang GZ, Dunn MJ. Image analysis tools and emerging algorithms for expression proteomics. Proteomics. 2010;10(23):4226-57. https://doi.org/10.1002/pmic.200900635
(Source for: deterministic spot-centric approaches discarding information early and propagating errors; automated image-based alignment as the alternative; the 2D gel image analysis pipeline.)
3. Görg A, Weiss W, Dunn MJ. Current two-dimensional electrophoresis technology for proteomics. Proteomics. 2004;4(12):3665-85. https://doi.org/10.1002/pmic.200401031
(Source for: gel-to-gel variation persisting with IPG strips and the need for replicate gels and image analysis; running conditions that affect reproducibility.)
4. Wheelock AM, Buckpitt AR. Software-induced variance in two-dimensional gel electrophoresis image analysis. Electrophoresis. 2005;26(23):4508-20. https://doi.org/10.1002/elps.200500253
(Source for: analysis software as a significant source of variance in quantitative 2D gel proteomics.)
5. TotalLab. SameSpots 2D gel analysis software. https://totallab.com/software/2d-gel-analysis-software/
(Source for: pixel-level alignment to a reference, manual vectors, review at any time, one spot pattern across the experiment, and the published DeCyder comparison quoted on the page.)
The table of causes of positional variation and the troubleshooting table are practitioner guidance drawn from the running conditions described in reference 3 and from TotalLab’s support experience; they carry no numerical claims.
See your gels aligned in under five minutes each
SameSpots aligns each image to your reference automatically, lets you place vectors where a gel needs help, and then detects one spot pattern across the whole experiment so that nothing is left to match. Request a trial and align your own gels.