Background Subtraction for 1D SDS-PAGE & Western Blot Analysis | Phoretix 1D

Why Background Subtraction Matters in 1D SDS-PAGE & Western Blot Analysis
Gel electrophoresis and Western blotting are fundamental techniques in molecular biology, used to separate and visualize biomolecules such as DNA, RNA, and proteins. These methods produce images showing bands or spots that correspond to the size and abundance of the molecules of interest. However, these images are rarely perfect — they almost always contain some level of background noise that can interfere with accurate quantification of bands.
Background noise can arise from various sources: non-specific binding of antibodies or stains, uneven illumination, dust, scratches, or instrument artefacts. If not corrected, this background signal can distort the intensity and shape of your bands, leading to inaccurate measurements of size, quantity, and relative expression. This is not a minor issue – uncorrected background can cause you to significantly overestimate or underestimate protein or DNA band intensities, compromising every downstream calculation that depends on those measurements, including normalization and relative expression analysis.
Background subtraction should therefore always be performed before quantifying bands or spots, regardless of how clean your gel or blot appears. Even images that look visually clean can carry a meaningful baseline signal that will skew your results if left uncorrected.
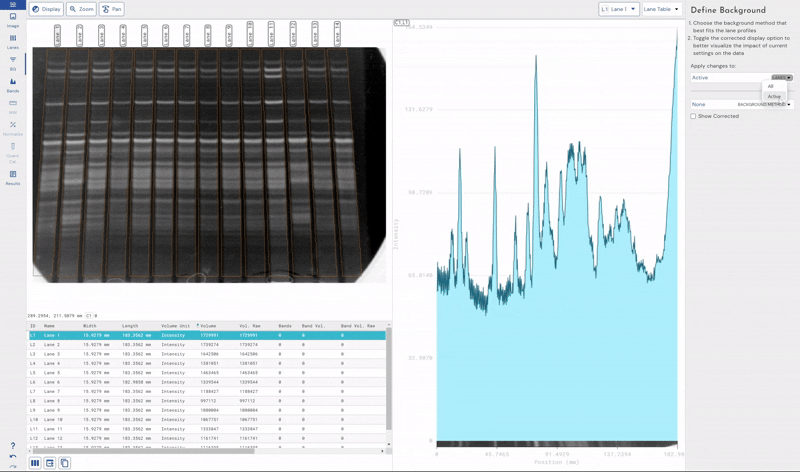
There are different methods of background removal depending on the software used for analysis. Within our Phoretix 1D software we offer several background subtraction techniques to choose from, based on the type of image you are analyzing.
Background Subtraction Methods Available in Phoretix 1D
Adaptive Methods
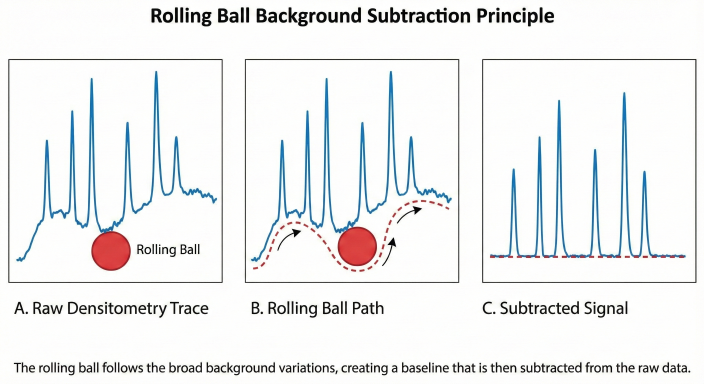
Rolling Ball
Rolling ball background removal works by imagining a ball rolling under the surface of the image, where the height of the surface is determined by the pixel intensity. The top of the ball represents the background intensity at each pixel, and it is subtracted from the original image to ensure you are only measuring the true intensity of each sample band.
Rolling ball is effective for images with smooth and continuous backgrounds. However, it is less reliable for lanes with closely-spaced bands or bands of widely variable sizes. In Phoretix 1D, the ball size is expressed as a percentage of the lane length rather than a fixed pixel radius — a significant advantage when working with high-resolution images or long lanes, where a fixed radius would produce inconsistent results.
Lane Edge
Lane Edge is specific to lane-based images such as Western blots or DNA gels. It uses the lower of the two pixel values at the edges of the lane as the background value at each point. If the area used is wider than your bands, this is a very effective way of removing co-migrating material from your measurements. It is particularly useful for images with multiple tightly spaced bands.
This method should only be used when bands are completely enclosed within the lane area. If the lane edges intersect any band, that band material will be treated as background and subtracted, which will severely underestimate your band intensities.
Rubber Band
The Rubber Band method works by stretching a virtual rubber band underneath the lane profile and using the pixel value below that band as the background at each point along the lane. It is a flexible, adaptive approach but should not be used when the values at the ends of the profile are lower than the centre of the profile, or when bands are poorly separated.
User-Defined Methods
None
No background removal at all. Only appropriate when you have already confirmed background is negligible.
Constant
Allows you to select a pixel intensity value from your lane, or type one manually, and subtract it uniformly from every pixel across the image. Suitable only for images with a truly constant background, which is uncommon in practice.
Image Rectangle
Allows you to draw a rectangular region of interest within your image — for example, an unused lane — and use the average pixel intensity within that area as a constant background value, applied in the same way as the Constant method above. Useful when you have a clearly empty reference region.
Profile Minimum
Sets the background level to the lowest pixel value found in the lane profile, applied as a constant across the lane. It is not advisable to use this method when the lowest point occurs at the extremities of the lane, as the result becomes dependent on where you drew the lane. This can be difficult to reproduce between analyses.
Which Background Subtraction Method Should I Use?
Choosing the right method depends on the characteristics of your image. The table below provides a quick guide:
| Method | Best for | Avoid when |
|---|---|---|
| Rolling Ball | Smooth, continuous backgrounds; high-resolution images with long lanes | Closely spaced bands; bands of very different sizes |
| Lane Edge | Tightly spaced bands; images where lane area is wider than bands | Lane edges intersect any band |
| Rubber Band | General use; moderately separated bands | Profile ends are lower than the centre; poorly separated bands |
| Constant | Images with confirmed, uniform background | Most real-world gel images |
| Image Rectangle | When a clear empty lane or region is present | No suitable empty reference region available |
| Profile Minimum | Simple images with a clear, uniform minimum | Minimum is found at lane extremities |
For most SDS-PAGE protein gels or Western blots, Rolling Ball is the best starting point. Switch to Lane Edge if your bands are very closely spaced, or use Image Rectangle if you have a clean empty lane available as a reference.
See every method in action
The tutorial below walks through all of these methods applied to a real gel image with a severe uneven background, demonstrating exactly when each technique succeeds or falls short — and how to use Phoretix 1D’s per-lane controls to handle images where one method alone isn’t enough.

What Happens If You Don’t Subtract Background?
Skipping background subtraction is one of the most common sources of error in gel quantification, and its effects are easy to underestimate.
Without background correction, every band intensity measurement includes both the true signal from your protein or DNA and the unwanted background signal sitting beneath it. This leads to:
- Overestimated band intensities, particularly for low-abundance bands where the background makes up a larger proportion of the total signal
- Reduced linearity, making it harder to accurately compare bands across a gel or between experiments
- Compromised normalization, since both your target and reference bands carry background error that compounds when you calculate ratios
- Poor reproducibility, because background levels vary between gel runs, imaging sessions, and operators — meaning your results will vary even when the biology does not
This is especially critical in regulated environments. In 21 CFR Part 11 and GMP-compliant workflows, reproducibility and traceability are not optional — inaccurate quantification due to uncorrected background is an audit risk. Phoretix 1D’s transparent, documented background subtraction algorithms are designed to support exactly these requirements.
Common Background Subtraction Mistakes to Avoid
Even with the right method selected, there are several common errors that can undermine your results:
Using Rolling Ball with closely spaced bands. When bands are very close together, the rolling ball cannot fit between them and will start to include band signal in its estimate of the background, causing under-subtraction in some areas and over-subtraction in others. Switch to Lane Edge in these cases.
Using Lane Edge when the lane area intersects a band. If you have drawn your lane area such that its edges clip the edge of any band, Lane Edge will count that band material as background and subtract it from your measurement. Always ensure your lane box fully encloses your bands before using this method.
Using Profile Minimum when the minimum occurs at the lane extremity. If the lowest pixel value in your profile is at the very top or bottom of the lane rather than in a clear background region, Profile Minimum will produce results that are highly sensitive to exactly where you drew the lane — making the analysis impossible to reliably reproduce.
Applying the same method to all lanes when backgrounds differ. Different lanes on the same gel can have meaningfully different background levels, particularly in multichannel images where different antibodies or stains have been used. Applying a single method and setting uniformly across all lanes will correct some accurately and under- or over-correct others. Phoretix 1D allows you to select a different method and parameters per lane and per channel to address this directly.
Not previewing before quantifying. Always preview your background subtraction result before finalizing your quantification. Phoretix 1D provides a real-time visualization of the background baseline overlaid on your lane profile — check that the baseline sits cleanly beneath your bands without cutting into them.
How to Remove Background in Phoretix 1D: Step-by-Step
- Import your gel image into Phoretix 1D. The software is compatible with all major image formats including TIFF, JPEG, PNG, and BMP, and supports images from all industry-standard scanners and imaging systems.
- Define your lanes and bands using the intuitive automated lane detection tool.
- Select a background subtraction method. Choose whether to apply it to just the active lane or all lanes simultaneously. For most gels, start with Rolling Ball and adjust the ball size parameter for an optimal fit.
- Preview your results. Verify that the background baseline follows the true background signal and does not cut into your bands.
- Quantify. Phoretix 1D automatically calculates corrected band intensities and also displays raw, uncorrected values so you can verify the subtraction independently.
Tip: Use Phoretix 1D’s side-by-side comparison to test different methods on the same image and select the one that best matches your data.
Adaptive Background Removal and Noise Correction in Phoretix 1D
At TotalLab, we prioritize scientific transparency. Our background detection algorithms are fully documented and openly available for review, so you always know exactly how your data is being processed. This is essential for validated workflows in regulated environments operating under 21 CFR Part 11 and GMP requirements.
Phoretix 1D offers advanced, user-friendly, and adaptable background removal techniques that account for the variability in gel images produced by different imaging devices. The software provides real-time visualization of how different background removal methods and parameter settings affect your data, enabling rapid fine-tuning without guesswork.
Uniquely, Phoretix 1D supports selecting different background subtraction techniques and settings on a per-lane basis — essential when lanes on the same gel have different background levels. For multichannel images, different methods and settings can be applied per channel, compensating for the different background levels introduced by different antibodies or stains on the same blot. This is particularly important for accurate Western blot normalization, where background errors in either your target or reference channel will compound in your final ratio.
Phoretix 1D also includes noise-reduction techniques to smooth intensity signals, producing cleaner lane profiles and more reliable band detection — particularly valuable for faint bands close to the detection limit.
If you are working with poor quality images due to high background, smearing, or other common Western blot issues, our Western blot troubleshooting guide covers the most frequent image quality problems and how Phoretix 1D’s tools can help you still obtain reliable, quantifiable data without repeating the experiment.
Background Subtraction and Total Protein Normalization
Background subtraction and normalization are closely linked steps in gel quantification, and errors in background correction will directly impact the accuracy of your normalization. Once your background has been subtracted, Phoretix 1D can use the corrected band intensities to perform total protein normalization or housekeeping protein normalization automatically.
For a detailed guide on normalization methods and how to choose between them, see our article on how to calculate Western blot normalization.
Ready to Improve Your Gel Quantification?
Phoretix 1D brings together automated lane and band detection, flexible per-lane background subtraction, noise correction, and full normalization into a single, easy-to-use platform — with full 21 CFR Part 11 / GMP compliance available via our AuditSafe module for regulated laboratory environments.
New to Western blot analysis? Our guide on how to read a Western blot walks you through interpreting band sizes, intensities, and linear range from first principles.
Try Phoretix 1D for free or book a demo with our scientific support team.